本次记录的是为包管理工具安装的 Nginx 启用 TLS1.3,而不是通过源码编译安装的 Nginx 启用 TLS1.3。
要启用 TLS1.3,需要 1.1.1 及以上版本的 openssl
具体可移步至官网详细阅读
但是 Linux 系统中使用的 openssl 版本大多达不到这个要求,所以得自己动手指定版本进行安装
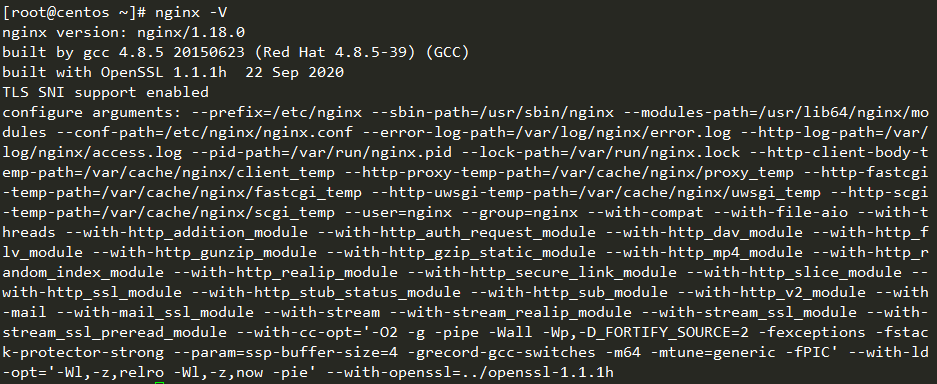
通过包管理工具安装的 Nginx 可使用 nginx -V 命令可查看安装时用到的 openssl 版本
本文使用 Debian 9 和 Centos 7 进行了测试,其他发行版可能会存在不同的问题
下载nginx源码
下载的nginx源码版本应与包管理器安装的版本相同
本次安装的是nginx稳定版1.18.0
1
2
| wget http://nginx.org/download/nginx-1.18.0.tar.gz
tar -xzvf nginx-1.18.0.tar.gz
|
下载openssl源码
到openssl官网下载源码
1
2
| wget https://www.openssl.org/source/openssl-1.1.1h.tar.gz
tar -xzvf openssl-1.1.1h.tar.gz
|
获取编译参数
使用nginx -V命令可查看 Nginx 的各种安装信息,复制configure arguments:后的所有编译参数
编译及配置
进入nginx源码文件夹
在上一步获取的参数后面添加以下参数
1
| --with-openssl=../openssl-1.1.1h
|
编译参数示例如下所示
1
| ./configure --prefix=/etc/nginx --sbin-path=/usr/sbin/nginx --modules-path=/usr/lib64/nginx/modules --conf-path=/etc/nginx/nginx.conf --error-log-path=/var/log/nginx/error.log --http-log-path=/var/log/nginx/access.log --pid-path=/var/run/nginx.pid --lock-path=/var/run/nginx.lock --http-client-body-temp-path=/var/cache/nginx/client_temp --http-proxy-temp-path=/var/cache/nginx/proxy_temp --http-fastcgi-temp-path=/var/cache/nginx/fastcgi_temp --http-uwsgi-temp-path=/var/cache/nginx/uwsgi_temp --http-scgi-temp-path=/var/cache/nginx/scgi_temp --user=nginx --group=nginx --with-compat --with-file-aio --with-threads --with-http_addition_module --with-http_auth_request_module --with-http_dav_module --with-http_flv_module --with-http_gunzip_module --with-http_gzip_static_module --with-http_mp4_module --with-http_random_index_module --with-http_realip_module --with-http_secure_link_module --with-http_slice_module --with-http_ssl_module --with-http_stub_status_module --with-http_sub_module --with-http_v2_module --with-mail --with-mail_ssl_module --with-stream --with-stream_realip_module --with-stream_ssl_module --with-stream_ssl_preread_module --with-cc-opt='-O2 -g -pipe -Wall -Wp,-D_FORTIFY_SOURCE=2 -fexceptions -fstack-protector-strong --param=ssp-buffer-size=4 -grecord-gcc-switches -m64 -mtune=generic -fPIC' --with-ld-opt='-Wl,-z,relro -Wl,-z,now -pie' --with-openssl=../openssl-1.1.1h
|
然后以下命令构建
构建完后替换Nginx
1
2
| mv /usr/sbin/nginx /usr/sbin/nginx.old
cp objs/nginx /usr/sbin/
|
在全局配置文件中使 Nginx 启用 TLS1.3
1
2
3
| ssl_protocols TLSv1.2 TLSv1.3;
ssl_ciphers ECDHE-ECDSA-AES128-GCM-SHA256:ECDHE-RSA-AES128-GCM-SHA256:ECDHE-ECDSA-AES256-GCM-SHA384:ECDHE-RSA-AES256-GCM-SHA384:ECDHE-ECDSA-CHACHA20-POLY1305:ECDHE-RSA-CHACHA20-POLY1305:DHE-RSA-AES128-GCM-SHA256:DHE-RSA-AES256-GCM-SHA384;
ssl_prefer_server_ciphers off;
|
修改完后重启 Nginx
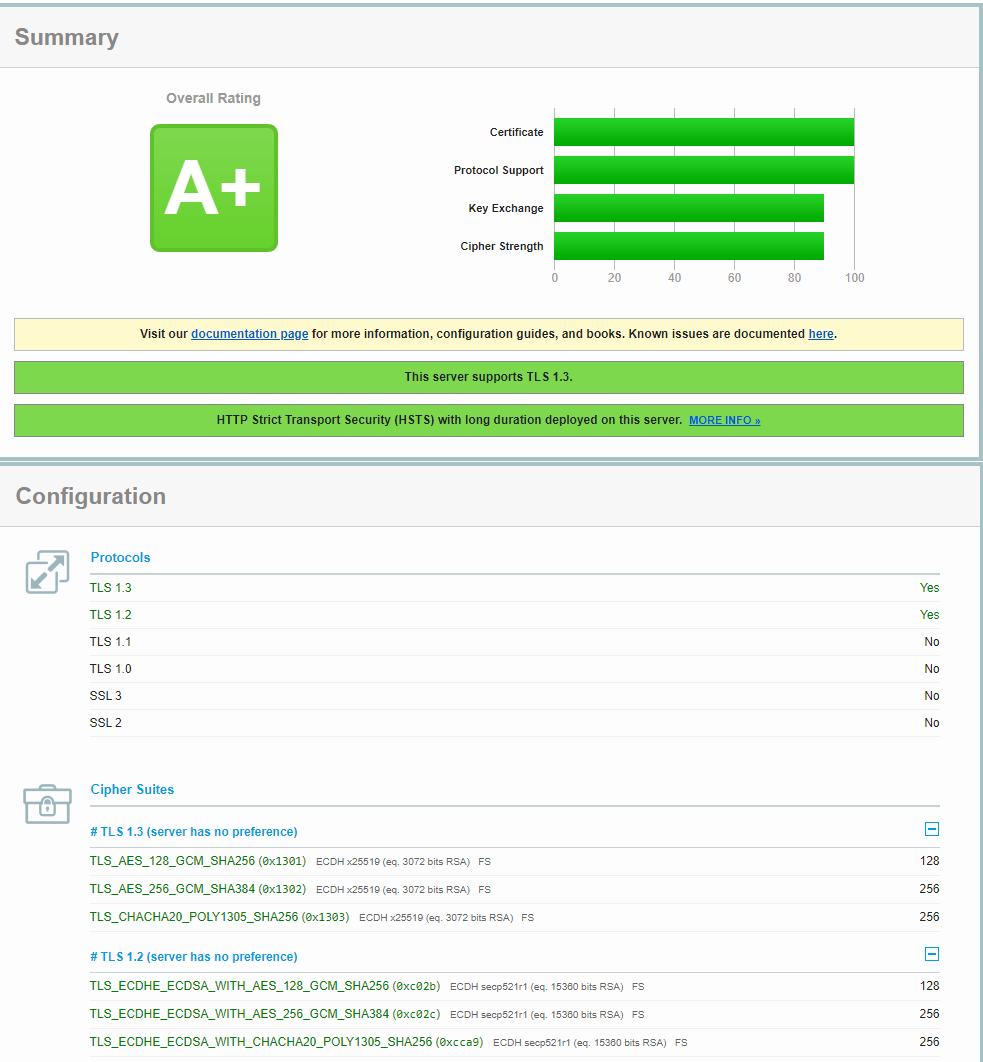
验证
使用nginx -V命令查看 Nginx 使用的 openssl 版本,如下图
进入SSL Labs验证一下是否开启 TLS1.3